Электрика
RUST FULL GUIDE | BINDS, COLORS, RESOLUTIONS, MONUMENT GUIDES, and CCTV CODES.
KEYBINDS NVIDIA COLORS NVIDIA STRETCH RESOLUTION MONUMENT RADIATION GUIDES BEST KITS BEST DLC's CCTV CODES AND MORE
USEFUL BINDS (2024):
!!! CREDIT GOES TO MULTIPLE PEOPLE FOR THESE KEYBINDS:
Banana Farmer,
JAKE,
Bagge,
STUNNA BOY,
GARREEF.
They are all linked so please go look at their guides.
- graphics.vm_fov_scale false ( GUN FARTHER AWAY / SMALLER )
- graphics.vm_fov_scale false ( LEFT HAND )
- player.recoilcomp true ( SNAP CROSSHAIR BACK BUT MORE PLACEBO )
- client.connect IP ( replace IP with server ip, helps when server wipes )
- quit ( CLOSES GAME )
- disconnect ( LEAVES SERVER )
- graphics.quality 0 ( UNKNOWN GRAPHICS, LOOKS BETTER IMO )
- culling.entitymaxdist 500 ( DISTANCE PLAYERS LOAD IN METERS, DEFAULT IS 3000... )
- bind x chat.say "/remove" ( GOOD FOR MODDED SERVERS )
- global.perf 1-6 ( ALL DO DIFFERENT THINGS , BUT SHOW PERFORMANCE )
- bind o hitnotify.notification_level 2;headlerp_inertia false;graphics.lodbias 5;gc.buffer 2048;graphics.waves false;player.recoilcomp true;+meta.if_true "grassshadows 1";+meta.if_false "grassshadows 0";graphics.itemskins 0;global.hideinteracttextwhileads 1;audio.master 5;audio.game 0.3;headlerp 100;environmentfishmanager.maxfishdistance 0;environmentfishmanager.maxfishpertype 0 ( HUGE PERFORMANCE BIND, MIGHT NOT WORK )
- bind KEY "gesture wave"
FULL LIST -
- bind mouse1 +lighttoggle;+attack2 ( TURN ON FLASH / LAZER WHEN AIMED *DONT RECCOMEND* )
- bind f1 consoletoggle;clear;combatlog ( OPENS COMBATLOG WHEN OPENING F1 CONSOLE )
THIS PART WAS DIRECTLY COPIED FROM dog IF YOU FIND MY GUIDE INTERESTING PLEASE CHECK OUT HIS, ITS SO MUCH BETTER.
Binding to your desired key:
Anywhere in the guide you see <key> you need to replace it with the key that you want to use. Anywhere in the guide you see <command> you need to replace it with the command that you want to use. For example I might replaces <key> with 'o' if I want the bind to be bound to 'o'.
How to make a custom bind:
How to bind 2 keys to 1 command:
bind <[key1+key2]> "<command>"
bind [leftshift+k] kill
For a command:
bind <key> "<command>"
bind y "graphics.fov 90"
For a hold to use:
bind <key> "<command1>;<command2>"
bind y "graphics.fov 70;graphics.fov 90"
For a toggle:
bind <key> "~<command1>;<command2>"
bind y "~graphics.fov 70;graphics.fov 90"
How to unbind a key:
bind <key> ""
bind y ""
AGAIN THAT PART WAS WORD FOR WORD COPIED FROM DOG. PLEASE GO FOLLOW HIS GUIDE.
Banana Farmer,
JAKE,
Bagge,
STUNNA BOY,
GARREEF.
They are all linked so please go look at their guides.
GENERAL COMMANDS
- effects.maxgibs -1 ( NO DEBREE )- graphics.vm_fov_scale false ( GUN FARTHER AWAY / SMALLER )
- graphics.vm_fov_scale false ( LEFT HAND )
- player.recoilcomp true ( SNAP CROSSHAIR BACK BUT MORE PLACEBO )
- client.connect IP ( replace IP with server ip, helps when server wipes )
- quit ( CLOSES GAME )
- disconnect ( LEAVES SERVER )
- graphics.quality 0 ( UNKNOWN GRAPHICS, LOOKS BETTER IMO )
- culling.entitymaxdist 500 ( DISTANCE PLAYERS LOAD IN METERS, DEFAULT IS 3000... )
- bind x chat.say "/remove" ( GOOD FOR MODDED SERVERS )
PERFORMANCE COMMANDS
- fps.limit -1 ( UNCAPPED FPS )- global.perf 1-6 ( ALL DO DIFFERENT THINGS , BUT SHOW PERFORMANCE )
- bind o hitnotify.notification_level 2;headlerp_inertia false;graphics.lodbias 5;gc.buffer 2048;graphics.waves false;player.recoilcomp true;+meta.if_true "grassshadows 1";+meta.if_false "grassshadows 0";graphics.itemskins 0;global.hideinteracttextwhileads 1;audio.master 5;audio.game 0.3;headlerp 100;environmentfishmanager.maxfishdistance 0;environmentfishmanager.maxfishpertype 0 ( HUGE PERFORMANCE BIND, MIGHT NOT WORK )
AUDIO BIND
- bind p ~meta.exec "audio.master 0.5" "audio.game 0.3"; meta.exec "audio.master 2" "audio.game 1" ( SOUND WHXRE TOGGLE )FUN BINDS / USELESS BINDS
You can bind emotes, here is the full list and one example.- bind KEY "gesture wave"
FULL LIST -
- "gesture victory",
- "gesture hurry",
- "gesture thumbsup",
- "gesture shrug",
- "gesture chicken"
PVP BINDS
- bind c +graphics.fov 90;graphics.fov 70 ( ZOOM BIND )- bind mouse1 +lighttoggle;+attack2 ( TURN ON FLASH / LAZER WHEN AIMED *DONT RECCOMEND* )
- bind f1 consoletoggle;clear;combatlog ( OPENS COMBATLOG WHEN OPENING F1 CONSOLE )
THIS PART WAS DIRECTLY COPIED FROM dog IF YOU FIND MY GUIDE INTERESTING PLEASE CHECK OUT HIS, ITS SO MUCH BETTER.
Binding to your desired key:
Anywhere in the guide you see <key> you need to replace it with the key that you want to use. Anywhere in the guide you see <command> you need to replace it with the command that you want to use. For example I might replaces <key> with 'o' if I want the bind to be bound to 'o'.
How to make a custom bind:
How to bind 2 keys to 1 command:
bind <[key1+key2]> "<command>"
bind [leftshift+k] kill
For a command:
bind <key> "<command>"
bind y "graphics.fov 90"
For a hold to use:
bind <key> "<command1>;<command2>"
bind y "graphics.fov 70;graphics.fov 90"
For a toggle:
bind <key> "~<command1>;<command2>"
bind y "~graphics.fov 70;graphics.fov 90"
How to unbind a key:
bind <key> ""
bind y ""
AGAIN THAT PART WAS WORD FOR WORD COPIED FROM DOG. PLEASE GO FOLLOW HIS GUIDE.
IF YOU HAVE ANY OTHER KEYBINDS PLEASE LEAVE A COMMENT AND I WILL ADD IT ^^
LAUNCH OPTIONS
In my option there are only 3 launch options that are useful for Rust.
- client.headlerp_inertia false
Turning off headlerp inertia means when you alt look, it doesn't use acceleration it just snaps back.
- client.headlerp 100000000
Setting the headlerp to a super high number is placebo but makes you feel like the head is snapping back faster. That number is what the acceleration would be ( if it was enabled )
- effects.maxgibs "-1"
-1 maxgibs is super helpful because every time you launch Rust it will reset this command and so having it in launch options is super helpful.
Here is the full copy paste.
-client.headlerp_inertia false -client.headlerp 100000000 -effects.maxgibs "-1"
To use launch options:
- Go to steam
- Right Click on Rust and open Properties
- In the launch options box, copy and paste my message
- Close the properties window and open Rust
NVIDIA STRETCH RESOLUTION
IF YOU HAVE A NVIDIA GRAPHICS CARD FOLLOW THESE INSTRUCTIONS
- Open NVIDIA Control Panel.
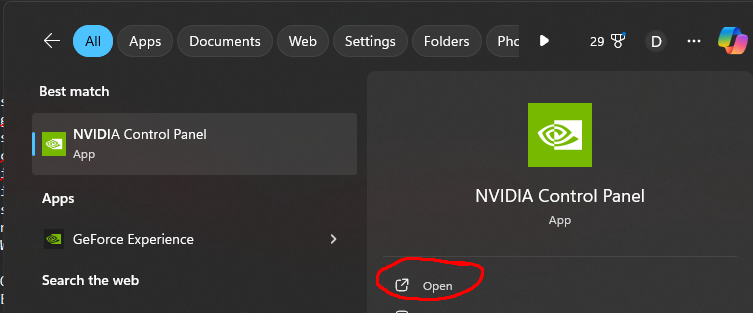
- Go to the "Adjust desktop size and position" tab.
- Set the scaling mode to "Full-Screen".
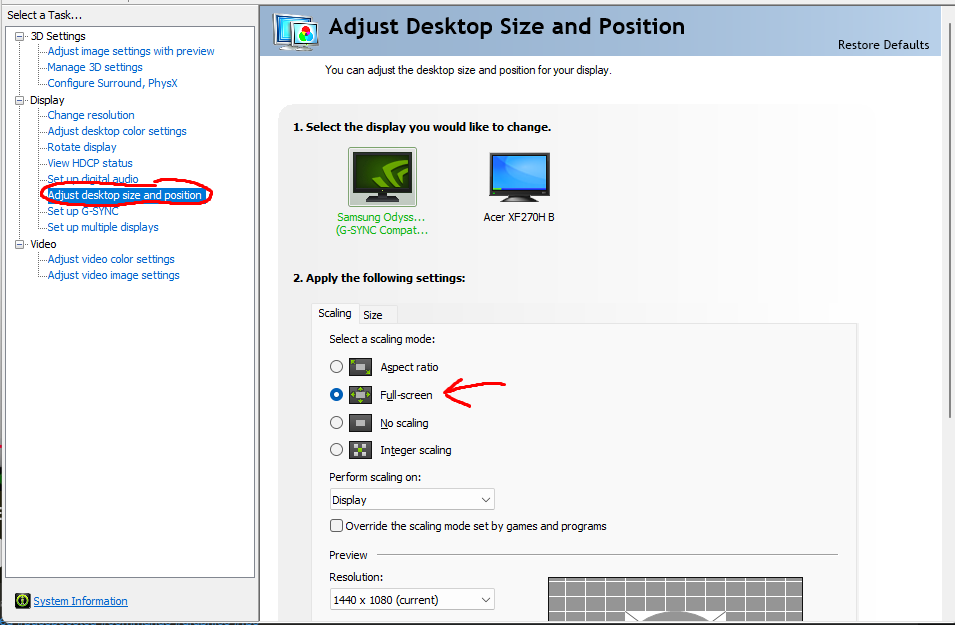
- Press "Apply" bottom right.
- Go to the "Change Resoultion" tab.
- Press the "Customize..." button.
- Make sure the "Enable resolutions not exposed by the display" checkbox is marked.
- Press the "Create Custom Resolution..." button.
- Set the res you would like, some good examples are:
- 1440x1080 ( my personal fav )
- 1280x1024
- 1350x1080
- 1080x1080 ( very bad, low quality, use the one below instead )
- 1440x1440 ( use instead, look at Otis' Video For Explanation )
- 1440x1080 ( my personal fav )
- MAKE SURE THE REFRESH RATE IS COMPATABLE WITH YOUR MONTIOR.
- Hit "Test" bottom right.
- Then hit "Yes" on the prompt asking if you want to apply the custom resolution
NVIDIA COLOR SETTINGS
IF YOU HAVE A NVIDIA GRAPHICS CARD FOLLOW THESE INSTRUCTIONS
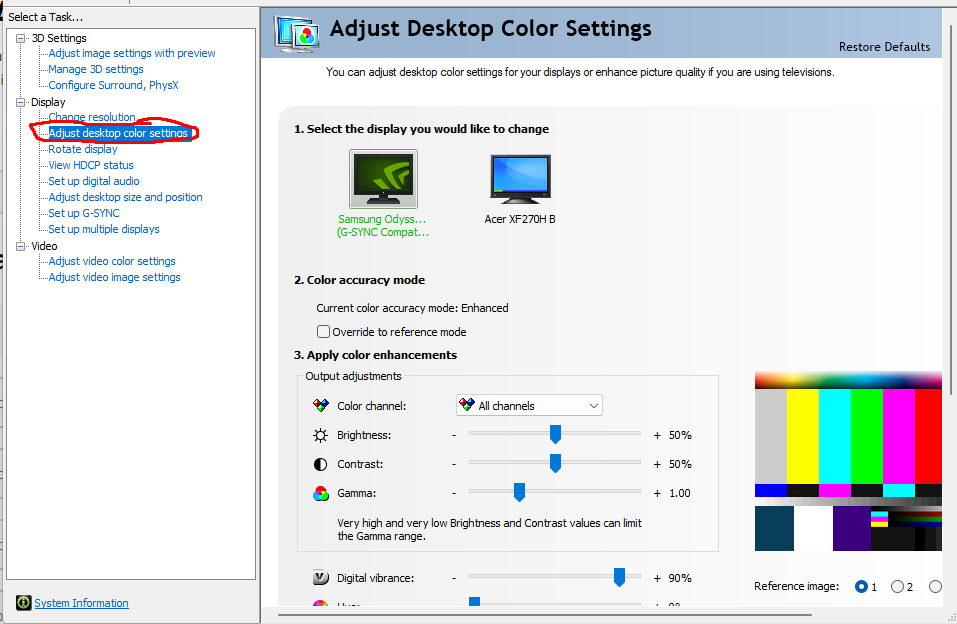
- Open NVIDIA Control Panel.
- Go to the "Adjust desktop color settings" tab.
- Set
- Brightness : 50
- Contrast : 50
- Gamma : 1.0
- Digital Vibrance: 90
- Hue : 0
- Brightness : 50
- MAKE SURE TO PRESS APPLY.
RESHADE
Please don't use Reshade
I really don't recommend it at all. Honestly, I think it just looks bad, there is a LOT of steps to enable it and then steps to maintain it on your computer. As well, you can get banned for using Reshade but it is 99.9999999999% chance you wont be.CHECK FOR MOUSE ACCELERATION
Everyone is at risk of having mouse acceleration on, Even I fell for it. I had mouse acceleration on for MONTHS and didn't understand why my aim was so "off" feeling.
-
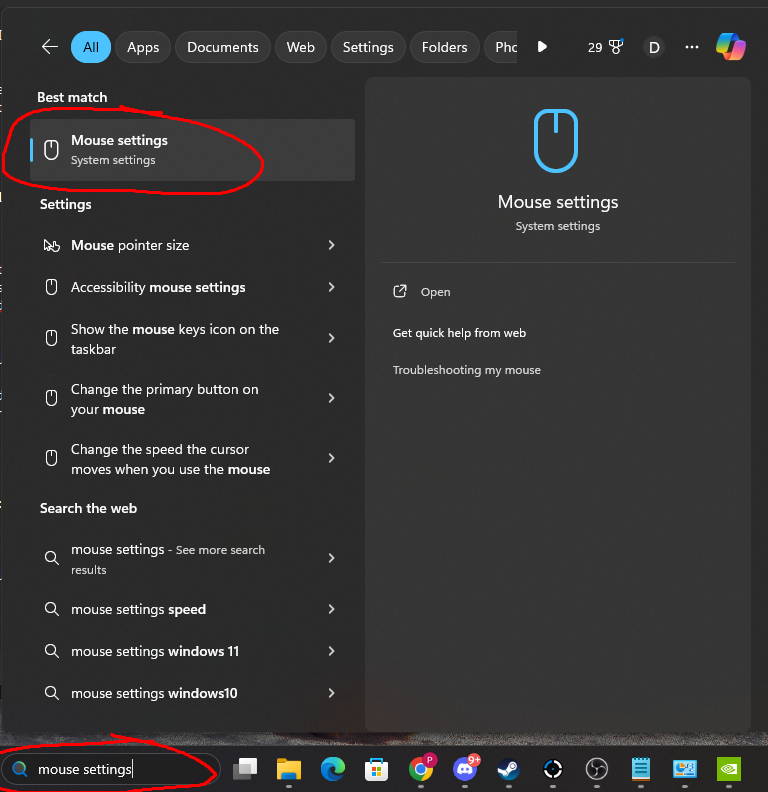
Search for mouse settings
-
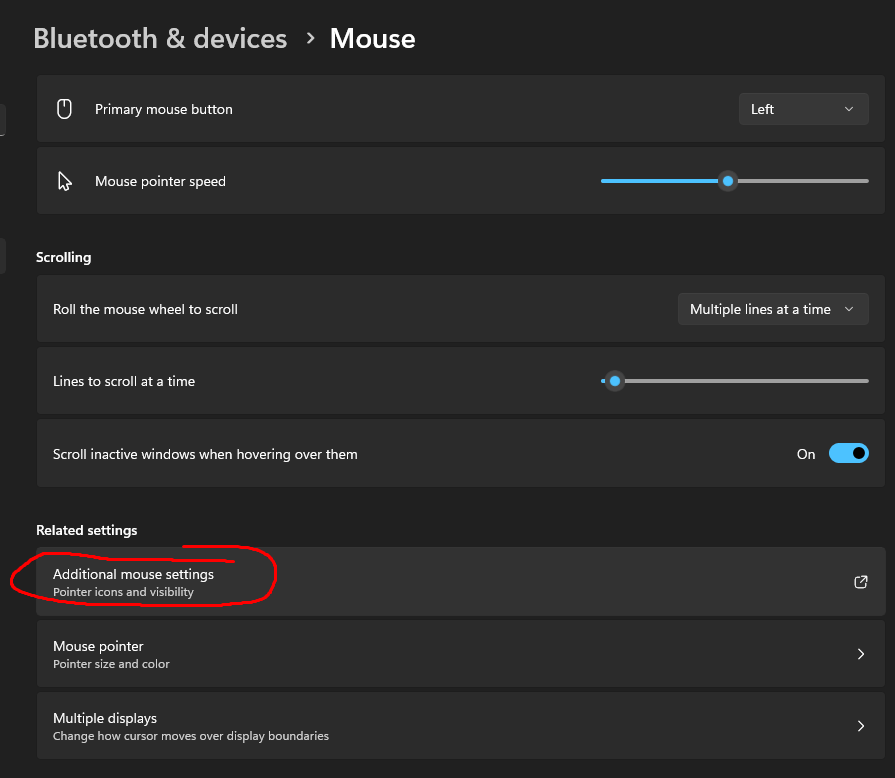
Click on "Additional Mouse Settings"
-
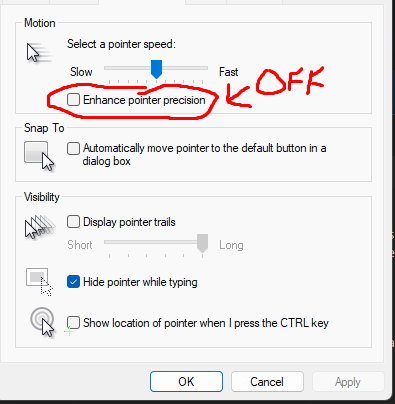
Click on "Pointer Options"
-
MAKE SURE "ENHANCED POINTER PRECISION IS OFF
RADIATION NEEDED FOR MONUMENTS
DOME
- 10 Radiation Protection Needed.
- Full Guide On Dome
TRAINYARD
- 11 Radiation Protection Needed For MOST Of Trainyard.
- 25 Radiation Protection Needed For Main, Switch Tower, and Water Tower.
- Full Guide On Trainyard
ARTIC BASE
- 2 Radiation Protection Needed For MOST Of Artic.
- 11 Radiation Protection Needed For Card Rooms.
- Full Guide On Artic Base
SATELLITE DISH
- 10 Radiation Protection Needed For Satellite Dish.
- Full Guide On Satellite Dish
GIANT EXCAVATOR
- 11 Radiation Protection Needed For Excavator.
- Full Guide On Giant Excavator
LAUNCH SITE
- 11 Radiation Protection Needed For Bottom Of Launch. ( around recycler building and ect )
- 25 Radiation Protection Needed For Rocket.
- 50+ Radiation Protection Needed For Main Building. ( you will still get radiation with a hazmat )
- Full Guide On Launch Site
MILITARY TUNNELS
- 11 Radiation Protection Needed For MOST Of Military.
- 50 Radiation Protection Needed For Card Rooms and Recycler.
- Full Guide On Military Tunnels
WATER TREATMENT
- 0 Radiation Protection Needed For MOST Of Water Treatment.
- 50 Radiation Protection Needed For Card Rooms, Sewers, and Water Tower.
- Full Guide On Water Treatment
AIRFIELD
- 11 Radiation Protection Needed For Airfield.
- Full Guide On Airfield
POWER PLANT
- 0 Radiation Protection Needed For MOST of Power Plant.
- 50 Radiation Protection Needed For Large Silos, Tower, and Main Buildings.
- Full Guide On Power Plant
SEWER BRANCH
- 11 Radiation Protection Needed For Sewer Branch.
- Full Guide On Sewer Branch
GOOD KITS AND THEIR STATS
Well Prodigy you might ask, what does an 11 or 25 radiation level kit look like? Well this is the section for it.
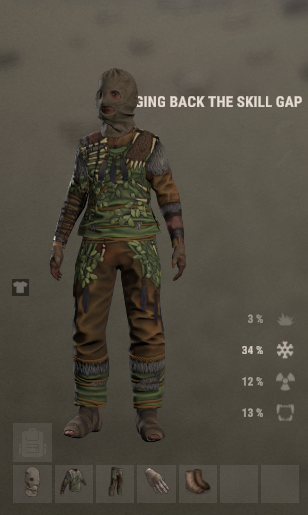
FULL CLOTH KIT ( INCLUDING BALACLAVA OR BANDANA ) GIVES:
- COLD : 34
- RADIATION : 12
- EXPLOSIVE : 3
- BITE : 13
- MELEE HEAD: 15%
- MELEE CHEST: 15%
- MELEE LEGS: 15%
- PROJECTILE HEAD: 15%
- PROJECTILE CHEST: 10%
- PROJECTILE LEGS: 15%
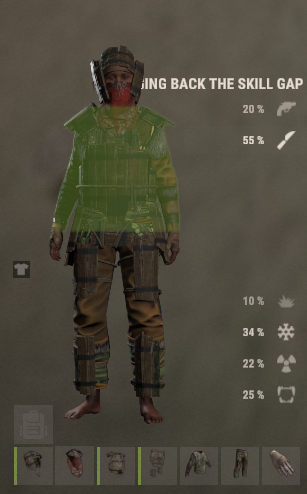
FULL CLOTH KIT + WOOD ARMOR GIVES:
- COLD : 24 ( WITH BANDANA IS 34 )
- RADIATION : 19 ( WITH BANDANA IS 22)
- EXPLOSIVE : 10
- BITE : 25
- MELEE HEAD: 25% ( WITH BANDANA IS 20% )
- MELEE CHEST: 55%
- MELEE LEGS: 50%
- PROJECTILE HEAD: 15% ( WITH BANDANA IS 20% )
- PROJECTILE CHEST: 20%
- PROJECTILE LEGS: 20%
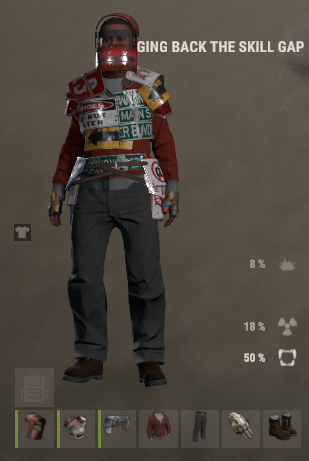
FULL ROADSIGN KIT + BOOTS GIVES:
- COLD : 0
- RADIATION : 18
- EXPLOSIVE : 8
- BITE : 50
- MELEE HEAD: 50%
- MELEE CHEST: 65%
- MELEE LEGS: 50%
- PROJECTILE HEAD: 35%
- PROJECTILE CHEST: 50%
- PROJECTILE LEGS: 45%
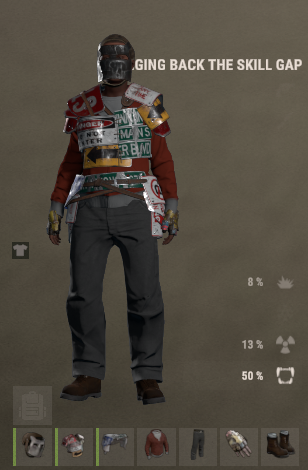
FULL ROADSIGN KIT + METAL FACEMASK + BOOTS GIVES:
- COLD : 0
- RADIATION : 13
- EXPLOSIVE : 8
- BITE : 50
- MELEE HEAD: 70%
- MELEE CHEST: 65%
- MELEE LEGS: 50%
- PROJECTILE HEAD: 50%
- PROJECTILE CHEST: 50%
- PROJECTILE LEGS: 45%
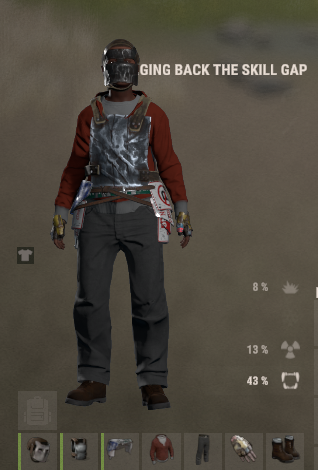
FULL METAL KIT + BOOTS GIVES:
- COLD : 0
- RADIATION : 13
- EXPLOSIVE : 8
- BITE : 43
- MELEE HEAD: 70%
- MELEE CHEST: 60%
- MELEE LEGS: 50%
- PROJECTILE HEAD: 50%
- PROJECTILE CHEST: 55%
- PROJECTILE LEGS: 45%
ARE THE DLCS WORTH IT / WHAT DLCS SHOULD I BUY?
First, the ACTUAL DLCS are definitely NOT worth it but, they make the game more enjoyable and give you fun things to play around with.
On the other hand, GENERAL STORE PACKS, are SUPER WORTH IT!!! I recommend the Arctic Pack This pack gives you the Artic Suit Hazmat Skin which, to massively summarize, gives you 33 radiation protection and 33 cold protection.
Another great pack is the Frontier bundle. It comes with barrels that can be used to put 5 boxes into one room without a shelf. It is super helpful overall.
For builders, I highly recommend the Brutalist pack. It helps with compound jumpers by removing the "lip" on roofs clipping through gatehouse walls.
Everything else is more optional and just for fun.
EVEN IF a pack isn't 100% useful, I still recommend you buy it! Who cares if you joke with it for like 5 minutes and never touch it again.
On the other hand, GENERAL STORE PACKS, are SUPER WORTH IT!!! I recommend the Arctic Pack This pack gives you the Artic Suit Hazmat Skin which, to massively summarize, gives you 33 radiation protection and 33 cold protection.
Another great pack is the Frontier bundle. It comes with barrels that can be used to put 5 boxes into one room without a shelf. It is super helpful overall.
For builders, I highly recommend the Brutalist pack. It helps with compound jumpers by removing the "lip" on roofs clipping through gatehouse walls.
Everything else is more optional and just for fun.
EVEN IF a pack isn't 100% useful, I still recommend you buy it! Who cares if you joke with it for like 5 minutes and never touch it again.
SHOULD I BUY THE BANDANA?
BUY THE BANDANA!!!!!!
It is super overpowered and extremely helpful in prim pvp. The bandana comes with 3 radiation protection, 10 cold protection, 5% projectile protection, and 10% melee protection. It is a no brainer. At the time of writing this you can buy a blue or green bandana off the steam store for 10 cents USD.CCTV CODES
FULL CREDIT FOR CODES GOES TO @Sirrus
LARGE:
OILRIG2HELIOILRIG2EXHAUST
OILRIG2DOCK
OILRIG2L6D
OILRIG2L6C
OILRIG2L6B
OILRIG2L6A
OILRIG2L5
OILRIG2L4
OILRIG2L3B
OILRIG2L3A
OILRIG2L2
OILRIG2L1
SMALL:
OILRIG1HELIOILRIG1DOCK
OILRIG1L4
OILRIG1L3
OILRIG1L2
OILRIG1L1
DOME:
DOMETOPDOME1
AIRFIELD:
AIRFIELDHELIPADMISSILE SILO:
SILOSHIPPINGSILOMISSILE
SILOTOWER
SILOEXIT2
SILOEXIT1
PAGER CODES:
LARGE - 4768SMALL - 4765
EXAV - 4777
ENDING NOTES
I hope someone finds this guide helpful or can reference it at least once haha.
If I used your work in this guide and you really want that part taken down please message me, I am more than happy to.
If you have ANY notes or comments or suggestions please comment it below and ill add it.
- PRODIGYPLAYER55 <3
Комментарии 0
Войди через Discord, чтобы комментировать